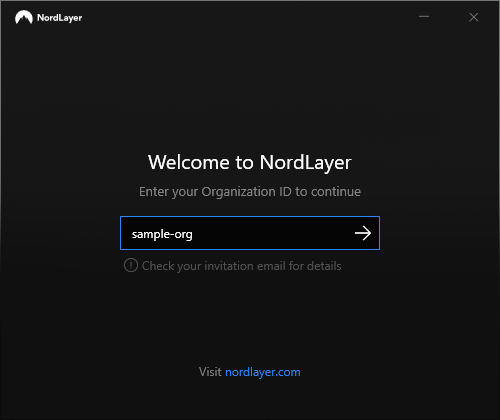
NordLayer has introduced a feature that allows presetting the Organization ID during the application installation for both Windows and macOS users. This enhancement significantly streamlines the setup process by automatically incorporating the Organization ID into the installation, thereby removing the need for manual input on both Windows and macOS devices. Once installed, the preset Organization ID remains saved and automatically fills in whenever a user needs to log back in after logging out.
This functionality proves especially beneficial for mass deployments, whether through device management software like Microsoft Intune or other tools. By having the Organization ID pre-included, the installation management becomes straightforward, enhancing efficiency and reducing the likelihood of input errors. This thoughtful change simplifies the installation process and elevates the operational workflow, ultimately improving the user experience across different platforms.
The feature streamlines the NordLayer setup for administrators. However, this change does not impact users who configured NordLayer manually. The Organization ID can only be pre-configured during the initial installation phase.
How to preset Organization ID on Windows
Step 1: Download NordLayer
For the executable file, visit the NordLayer website, and for the MSI package, go to the Help Center (make sure to download the latest version of NordLayer, version 3.2.0 or higher).
Step 2: Preset the Organization ID
- Open an administrator command prompt in Windows
- Press the Windows key + X on your keyboard
- Type cmd in the search bar
- Right-click on Command Prompt in the search results
- Select Run as administrator
- If prompted by User Account Control (UAC), click Yes to grant administrative privileges
Using a .exe file:

Navigate to the installation file directory. Use the cd command to change directories. You’ll need to add a /exenoui /qn parameters to the NordLayerSetup.exe executable file
Using a .msi file:

Use the cd command to change directories. For example, if your MSI file is in the Downloads folder, type cd Downloads and press Enter. You’ll need to add /qn parameters to the NordLayerSetup.msi file.
To add an Organization ID preset, the format of the command should be as follows: ORGANIZATION=sample-org. Replace sample-org with the actual ID provided to you.
Note: The command ORGANIZATION=sample-org can also be used for installation through device management software such as Microsoft Intune.

After installation, open NordLayer. You should notice that the Organization ID field is already filled in with the ID you preset during the installation.
If the ID is not prefilled, ensure that you entered the correct command and that your NordLayer version supports this feature.
How to preset the Organization ID on macOS
Step 1: Download NordLayer
You can access the macOS download links via the NordLayer website (make sure to download the latest version of NordLayer).
Step 2: Preset the Organization ID
- Open the Terminal application on your computer (it can be found in the Utilities folder within your Applications directory)
- Enter the following command:
xattr -w com.nordlayer.organization_id sample-org /path/to/the/file.pkg - Here, replace /path/to/the/file.pkg with the actual file path of the downloaded .pkg file. Note the value sample-org and ensure it is used consistently.
- To ensure the attribute is set correctly, enter the following command in Terminal:
xattr -l /path/to/the/file.pkg - Review the output. Look for com.nordlayer.organization_id. Check if its value matches sample-org. If it does, the setup is correct.
Note: In case you have any questions or are experiencing any issues, please feel free to contact our 24/7 customer support team.