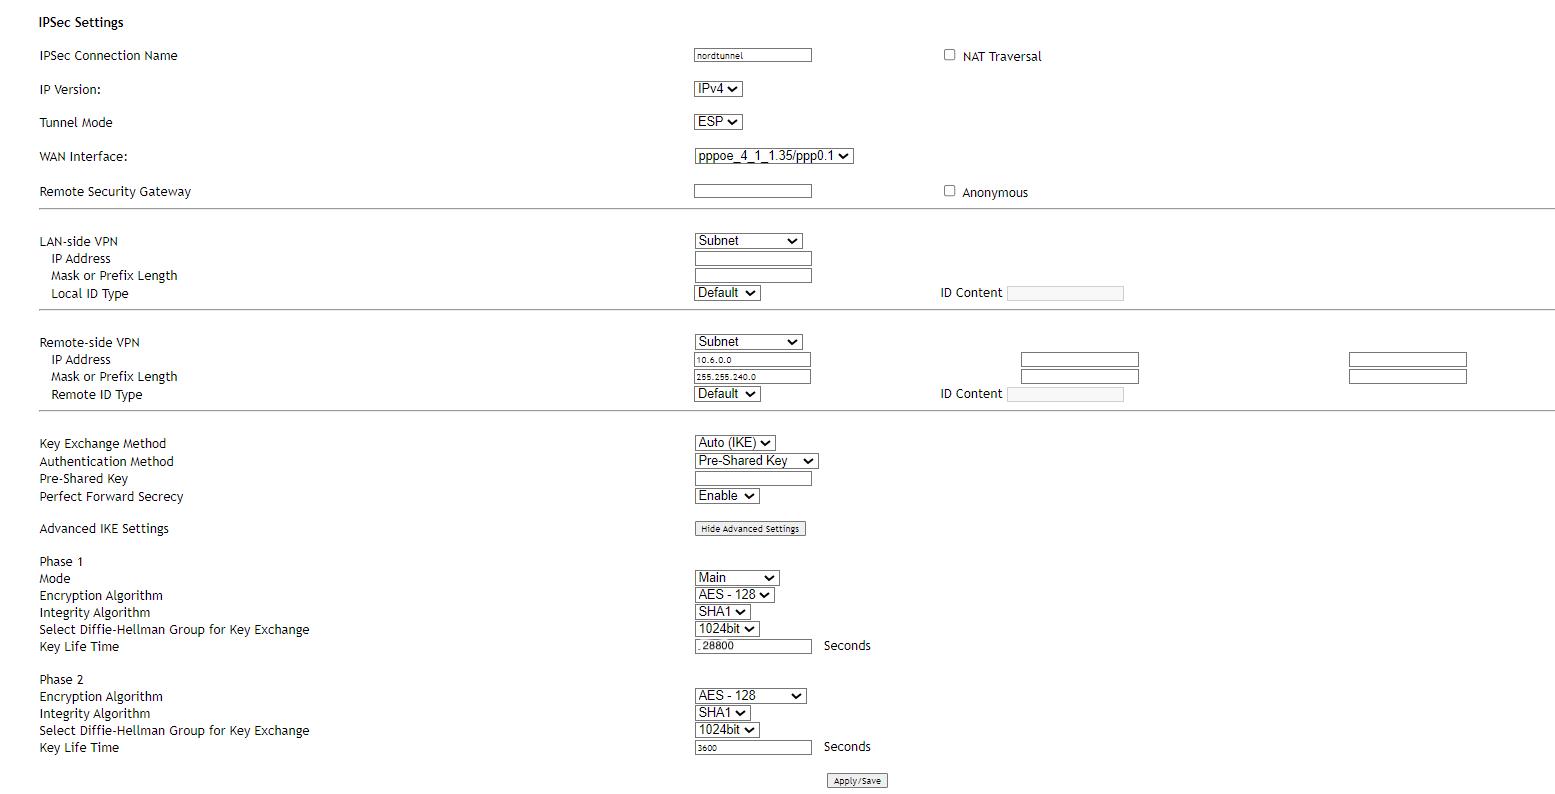
This guide walks you through setting up a site-to-site IPsec tunnel on SmartRG routers, specifically using the SmartRG SR516AC as a reference. However, this setup process applies broadly across all SmartRG SR series routers, thanks to their similar interfaces and IPsec tunneling features.
Accessing the router
First things first, log into your router's management console. You'll want to dive into the Advanced Setup section. Here, look for the IPsec option and hit Add.
Configuring IPsec
Now, you'll enter the details of your IPsec connection:
- IPsec Connection Name: NordLayer
- IP Version: IPv4
- Tunnel Mode: ESP
- WAN Interface: Choose the WAN interface you're using
- Remote Security Gateway: Type in the public IP address of your NordLayer server with a dedicated IP
Setting LAN-side VPN
Under LAN-side VPN, select Subnet and input your local network's subnet in IPv4 format, along with the subnet mask in octets. Leave the Local ID Type as Default.
Defining remote-side VPN
For the remote-side VPN:
- IP Address: Use the NordLayer subnet, which is 10.6.0.0
- Mask or Prefix Length: 255.255.240.0
- Remote ID Type: Default
Key Exchange and Authentication
Choose Auto (IKE) for the Key Exchange Method and Pre-Shared Key for the Authentication Method, entering your generated pre-shared key. Don't forget to enable Perfect Forward Secrecy.
Adjusting Advanced Settings
Expand the section titled Hide Advanced Settings for detailed phase settings:
Phase 1:
- Mode: Main
- Encryption Algorithm: AES - 128
- Integrity Algorithm: SHA1
- Select Diffie-Hellman Group for Key Exchange: 1024bit
- Key Lifetime: 28800 seconds
Phase 2:
Same settings as Phase 1, with a Key Lifetime of 3600 seconds

Configuring Firewall and WAN
For the tunnel to work smoothly, you must allow ports 500 and 4500 through your firewall. Head back to Advanced Setup, navigate to Security → IP Filtering → Incoming and click Add.
You'll need to set up two rules, one for each port:
- Filter Name: Choose a name for your rule
- Interfaces: Select the WAN interface used for the tunnel
- IP Version: 4
- Protocol: TCP or UDP
- SrcIP/PrefixLength: anywhere
- SrcPort: all
- DstIP/PrefixLength: anywhere
- DstPort: Specify 500 for one rule and 4500 for the other
- Action: Allow

Note: In case you are experiencing different results, make sure that you have you carefully gone through all the steps. Having said that, in case the issue persists please feel free to contact our 24/7 customer support team.