The NordLayer Sites feature creates a secure site-to-site connection to your internal business LAN using a Virtual Private Gateway and a server with a dedicated IP.
How to create a Site?
1. Log into the NordLayer Control Panel
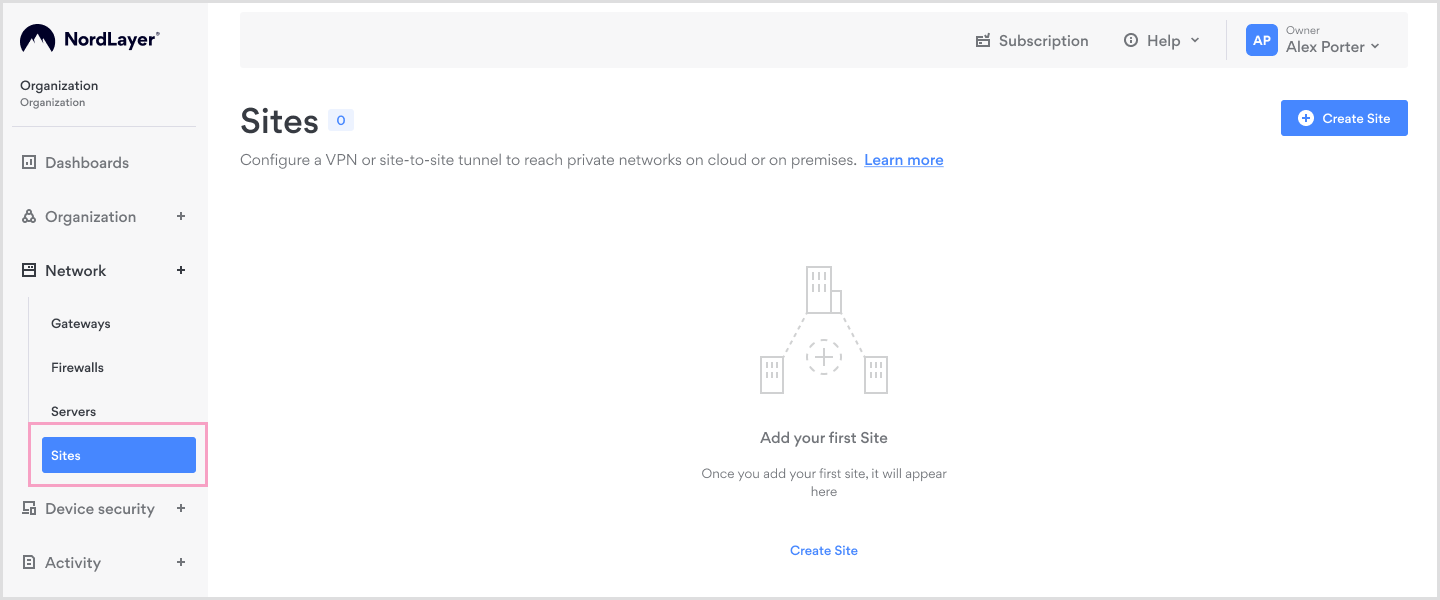
2. Click the Network accordion on the left side
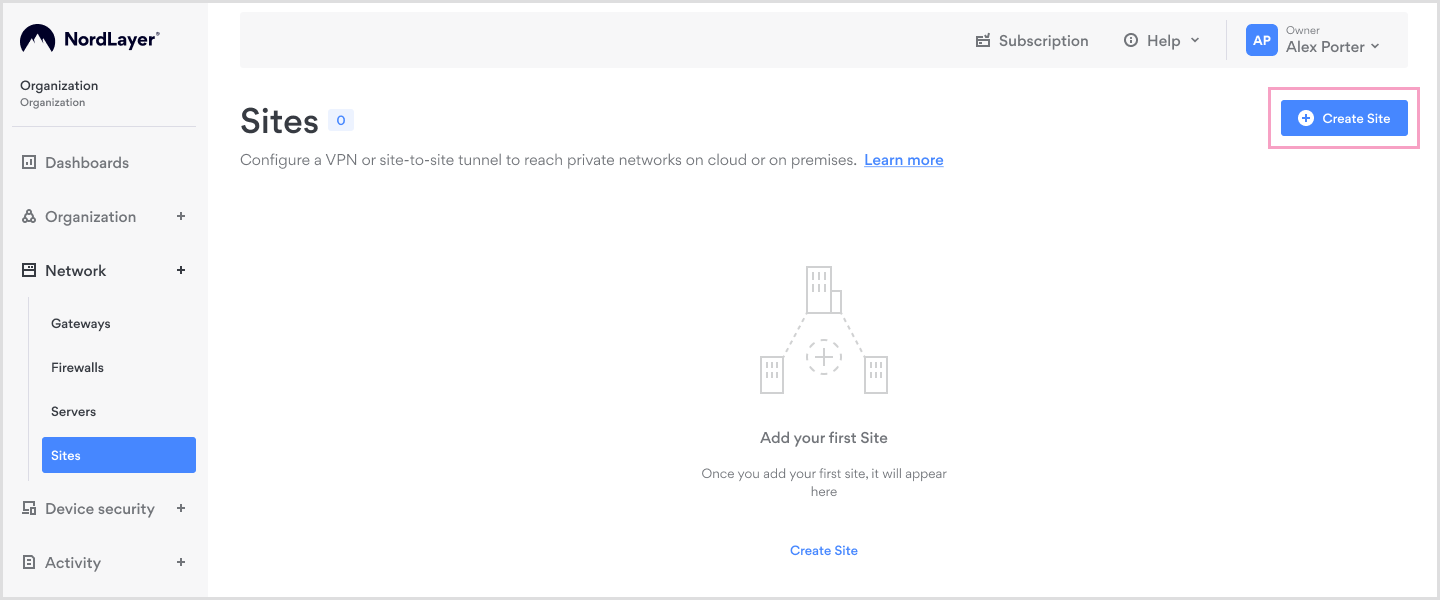
3. Click Sites and select Create Site
Set up IPsec (Site-to-Site) tunnel:
To proceed with the site-to-site setup, fill in the information in the order form:
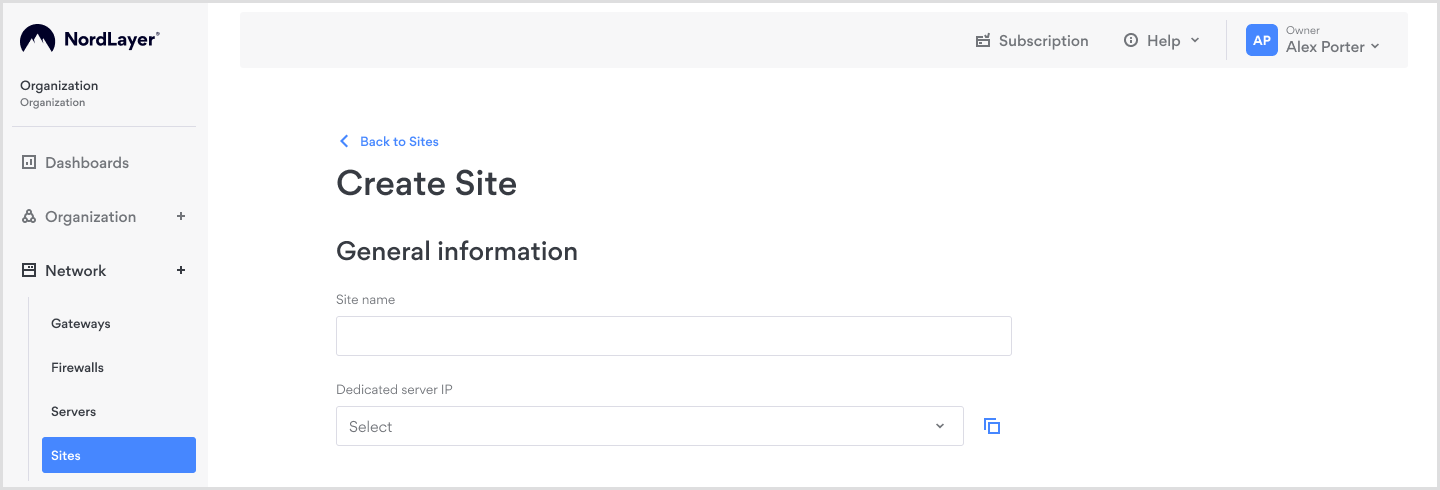
- Site name — name your configuration
- Dedicated server IP — from the dropdown list choose which dedicated gateway IP address will be used for site-to-site configuration
- Choose the type of site-to-site setup
On-premise setup
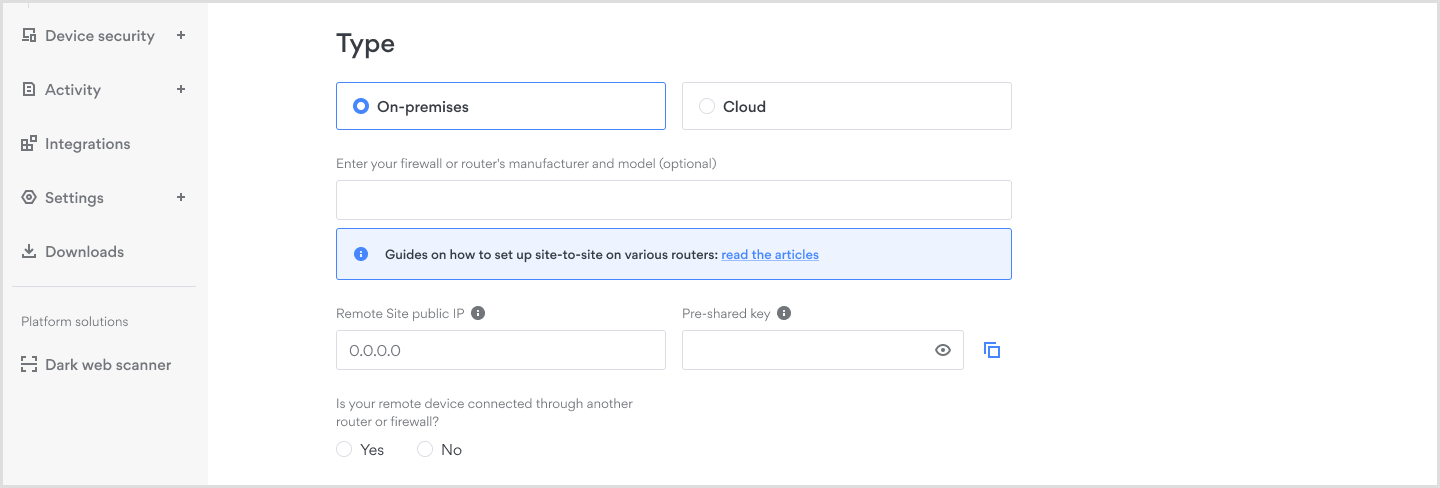
For on-premise setup, you will need to enter the full model name of your router or firewall in the provided field. Guides for routers:
- Setting up site-to-site on SmartRG router
- Setting up site-to-site on UniFi USG
- Setting up site-to-site on TP-Link router
- Setting up site-to-site on Synology router
- Setting up site-to-site on D-Link DIR-130/330
- Setting up site-to-site on Linux server
- Setting up site-to-site on Zyxel USG
- Setting up site-to-site on WatchGuard
- Setting up site-to-site on Untangle NG
- Setting up site-to-site on Sophos XG
- Setting up site-to-site on SonicWall
- Setting up site-to-site on pfSense
- Setting up site-to-site on Palo Alto
- Setting up site-to-site on Netgear BR500 router
- Setting up site-to-site on Linksys router
- Setting up site-to-site on Juniper (JunOS) SRX
- Setting up site-to-site on FortiGate
- Setting up site-to-site on DrayTek Vigor 3900
- Setting up site-to-site on Cisco Meraki
- Setting up site-to-site on Check Point
- Setting up site-to-site on Barracuda
- Setting up site-to-site on Asus BRT-AC828
- Setting up site-to-site on Ubiquiti EdgeRouter / EdgeMax
Cloud setup

For a cloud setup – you can either select your cloud service provider from the dropdown menu or manually enter your cloud service provider's name. Guides for cloud providers:
- Setting up site-to-site on Alibaba Cloud
- Setting up site-to-site on Google Cloud Platform
- Setting up site-to-site on Google Cloud (VPC peering)
- Setting up site-to-site on IBM Cloud
- Setting up site-to-site on AWS Virtual Gateway
- Setting up site-to-site on AWS Transit Gateway
- Setting up site-to-site on Microsoft Azure
- Guide to AWS Configuration
Encryption settings configuration
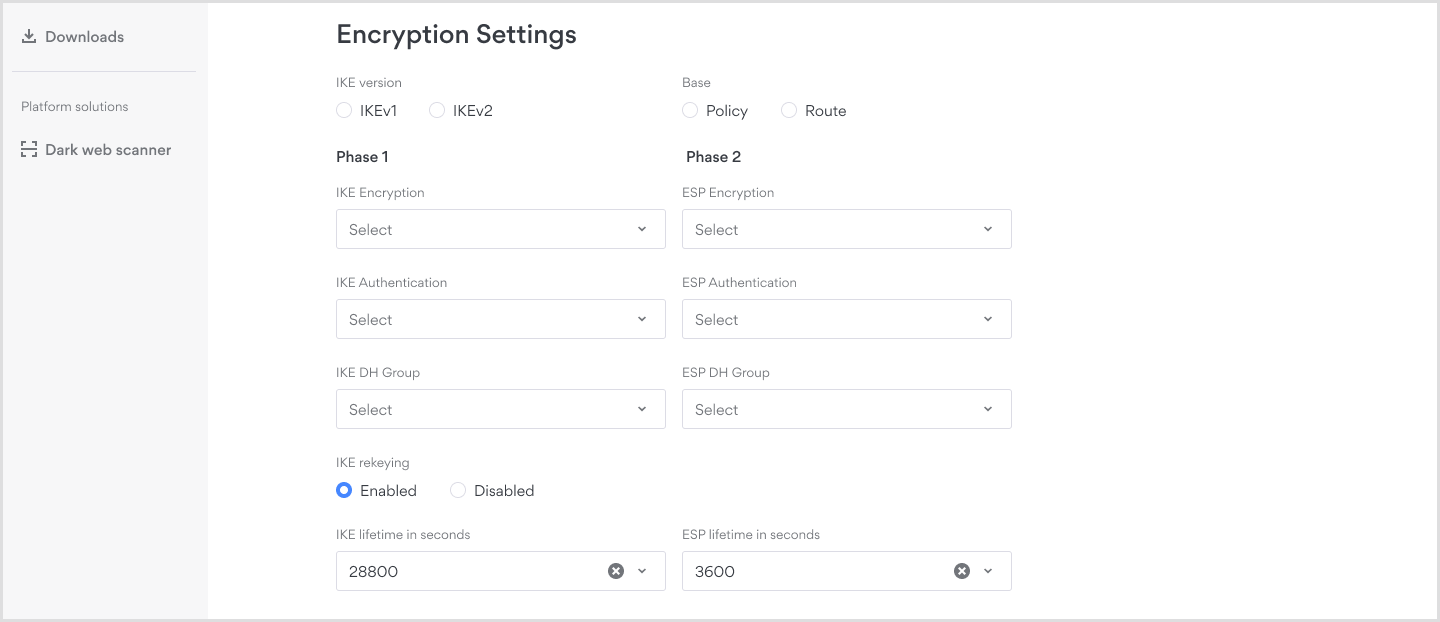
Base:
- Policy-based is used by default for Sites configured with on-premises tunnel type.
- Route-based is mainly used for Cloud setups but may vary per cloud service provider.
IKE version: For the best results, IKEv2 is the default value (also known in IPSec as IKE). IKEv1 is reserved for some cloud providers and older firewall/router hardware.
Remote IP: Public IP address of your office, home, or any other place where the site-to-site connection will be used.
Subnets: The internal subnet(s) of the local network where your router, firewall device, or server is connected.

- The default subnets used for routers or cloud networks are often configured with IP addresses in the ranges of 192.168.0.0/24, 10.0.0.0/24, or 172.16.0.0/12. You can use an online tool to determine the appropriate subnet mask to define the range of your own subnet, which can be accessed via a site-to-site tunnel.
- Your public IP must be static
- A maximum of 50 subnets per Site can be added.
- If you need to update your subnet, please reach out to support@nordlayer.com with a different private subnet range that uses a /20 mask and has .0.0 as the last two octets (e.g., 10.7.0.0/20, 192.168.0.0/20, 172.16.0.0/20). Additionally, specify the reason for the change (e.g., conflicts with your existing private subnets).
Pre-shared secret key: A password for authentication. This can be pre-generated by your tool, or you can generate it yourself with any password manager.
Local tunnel IP or (-ln Tunnel1). Can be found in the AWS site-to-site config.
Remote tunnel IP or (-lr). Can be found in the AWS site-to-site config. It is 1 IP address lower than the local tunnel IP.
To obtain local tunnel IP and remote tunnel IP values, refer to the following line in your AWS config file:
#leftupdown=” /etc/ipsec.d/aws-updown.sh -ln Tunnel1 -11 XXX.XXX.XX.XXX/30 -lr XXX.XXX.XX.XXX/30 -m 100 -r <VPC CIDR>”IKE Encryption type: Phase 1: the actual encryption that will be used. AES type, SHA type, and DH group. Use this resource (IANA corresponds to the DH group that your tool is using) to determine the keyword you should enter in this order form field.
ESP Encryption type: Phase 2: usually mirrors the values entered as IKE encryption type. However, it can be different based on the router, firewall device, or server you are using.
We suggest using IPSec/IKEv2 AES256, SHA256 with DH Group 14 (equivalent to modp2048) at the minimum for the optimal site-to-site experience.
Once you enter all the information and click on Create Site, please allow some time for the feature to be enabled. You will receive an email with confirmation once it’s ready.
Site configuration details
When you create a Site, the dashboard displays comprehensive information, including the server location (represented by a country flag), IP address, and NordLayer subnet allocation. The configuration table provides the following details:
- Configuration Type: Indicates whether the site is configured as on-premises or cloud-based
- Remote IP: Shows the IP address of the remote site
- Configuration Status: Reflects the current status of the VPN tunnel phases combined
- Configuration State: Reflects the current state of configuration deployment
Configuration state indicators
| State | Description |
|---|---|
Applied | Configuration has been successfully deployed to your dedicated server |
Applying | Configuration is currently being deployed to your dedicated server |
Failed | Configuration deployment encountered an error and was unsuccessful |
Suspending | Configuration is in the process of being disabled |
Suspended | Configuration has been disabled |
Removing | Configuration is in the process of being deleted |
Connection status monitoring
The connection status column provides real-time visibility into the operational state of your site-to-site tunnels. A fully functional tunnel requires the successful completion of two distinct phases:
Phase 1: Initial negotiation where the NordLayer server and your edge device (typically a router) exchange security parameters and establish a secure communication channel.
Phase 2: Following successful Phase 1 completion, this phase involves more detailed parameter exchange to establish the operational VPN tunnel for actual data transmission.
Status matrix
The table below outlines the various status combinations you may encounter:
| Main status | Phase 1 status | Phase 2 status |
|---|---|---|
| Connecting | Created, Connecting | Undefined |
| Connecting | Established, Rekeying, Rekeyed | Undefined |
| Connecting | Established, Rekeying, Rekeyed | Created, Routing, Installing |
| Up | Established, Rekeying, Rekeyed | Installed, Updating, Rekeying, Rekeyed |
| Down | Deleting, Destroying | Undefined |
| Down | Created, Connecting, Established, Rekeying, Rekeyed | Retrying, Deleting, Deleted, Destroying |
| Unknown | Error fetching data | Error fetching data |
Performance metrics
Traffic analysis
The dashboard provides detailed traffic analysis metrics for each active tunnel:
- Inbound Traffic: Quantifies data received through the tunnel (displayed in appropriate units: bytes, KB, MB, GB)
- Outbound Traffic: Quantifies data transmitted through the tunnel (displayed in appropriate units: bytes, KB, MB, GB)
- Time (connection duration): Displays the uptime since the tunnel achieved ESTABLISHED status (format: DD hh:mm:ss)
IKE security key management
The system displays the remaining time until the next Internet Key Exchange (IKE) rekeying event. Time intervals are presented according to the following convention:
- Intervals under 2 minutes: Displayed in seconds
- Intervals between 2 minutes and 2 hours: Displayed in minutes
- Intervals between 2 hours and 2 days: Displayed in hours
- Intervals exceeding 2 days: Displayed in days
Configuring Sites for gateways with multiple servers
Since multiple servers can be assigned to a single gateway, configuring Sites to operate under this model requires a few additional steps. To successfully use a gateway with multiple servers in conjunction with Sites connections, you must set up separate respective Sites for each NordLayer server within the gateway.
For example, if your gateway comprises two NordLayer servers, you would need to configure separate respective Sites for each NordLayer server. You need to update the local NordLayer subnets to prevent potential routing issues when adding new servers. To request a local subnet change, please reach out to our customer support team.
In case you have any questions or are experiencing any issues, please feel free to contact our 24/7 customer support team.